For the Level 2 final challenge in the Altenew Educator
Certification Program, I was given the following items to complete:
~Select ANY 3 components from the
classes in Level 1 or 2
~Make 4 MASCULINE
cards (Themes are; birthday, Love/Thinking of You, Anniversary, and
Encouragement).
~Make an Altered
Item/Upcycled Project.
I used a lot of techniques from the courses I have
taken. The techniques I highlight here
are how I see the groupings of Techniques that I chose to highlight:
·
Heat Embossing Techniques – I did a lot
of layering of heat embossing using the same embossing powder and different
embossing powders. I also used a stencil
for heat embossing and I made a background with clear embossing powder.
·
Backgrounds with a Twist – I made one
background by die cutting a coverplate and using that as a stencil. I also used the die cut and added layers of
embossing powder. I also die cut a cover
plate and used that as the background (with no backing) which made an interesting
background. I also did a different
design for cutting the opening of the front panel on one card.
·
Layering – My cards include layering with
stencils, layering with stamps, Layering embossing powders, layering my images
and layering on my backgrounds with a twist.
Let me go through my cards and how I put them together.
Venice and Lake Card:
For these two cards, I used the Altenew Let’s Go Bundle.
I used the layering stencil to create both main images. As I started, it looked a little odd, but as
you add the layers, it really does come together.
For the lake card, I made a mask for my sun and then used my
blue blending brush (without adding any additional ink, just using what was
already in the brush) and lightly added some color to the sky.
I die cut the circles I had stenciled. For the lake card, I die cut the circle from
the die set in black cardstock. I cut
another full in black cardstock just a bit bigger than the circle and then put
embossing ink around the edges and added sterling embossing powder and heated
it up. I repeated this to make a great silver
background for the Venice card.
I then die cut the Altenew Garden
Trellis Cover Die on black cardstock.
I then took that die cut and used it as a stencil to stencil on another
sheet of black cardstock with embossing ink.
I did half of the image at a time and was able to add sterling embossing
powder to both the die cut and then stenciled image. I did this 3 times (or 3 layers) to give me a
very smooth embossed image.
I took the stenciled image and trimmed it to 4 x 5 ¼ and
then down one line of image so I had two pieces with a diagonal cut.
For the Venice card, I cut a teal 8 ½ x 11 cardstock down to
8 ½ x 5 ½ (giving me 2 sheets) I scored
at 4 ¼ on both pieces. Then I trimmed a
sliver off one side and then glued that the other (basically overlapping both
for the back part of the card). This
gives me a panel to fold over from each side.
I then measured out a diagonal based on the previously cut stenciled
image and cut that on each side so that each would meet.
I next took the sentiment from the stamp set and stamped it
on teal and embossed in sterling. I
added this on foam at the bottom of my card.
I added my Venice circle and attached to one side only, but centered on
the card.
For the lake card, I die cut the cover plate in turquoise
cardstock. I cut a piece of pattern
paper to 4 ¼ x 5 ½. I then used some of
the extra to cut a small piece that was 5 ½ tall and about ¾ wide. I scored that thin pieces and then glued the
pattern paper and the die cut cover plate together using this small piece.
I cut another circle the size of the stenciled circle in
both white and black. I put the stencil
image on the front with glue, put the black circle behind it. Then I put the white circle on the black,
added adhesive, then closed the back panel on it so it would line up.
I stamped the sentiment from Altenew Inspiring
Quotes: Sunshine on black cardstock
with embossing ink and embossed in gold.
I cut this down and another rectangle the same size so I could put that
behind it as well.
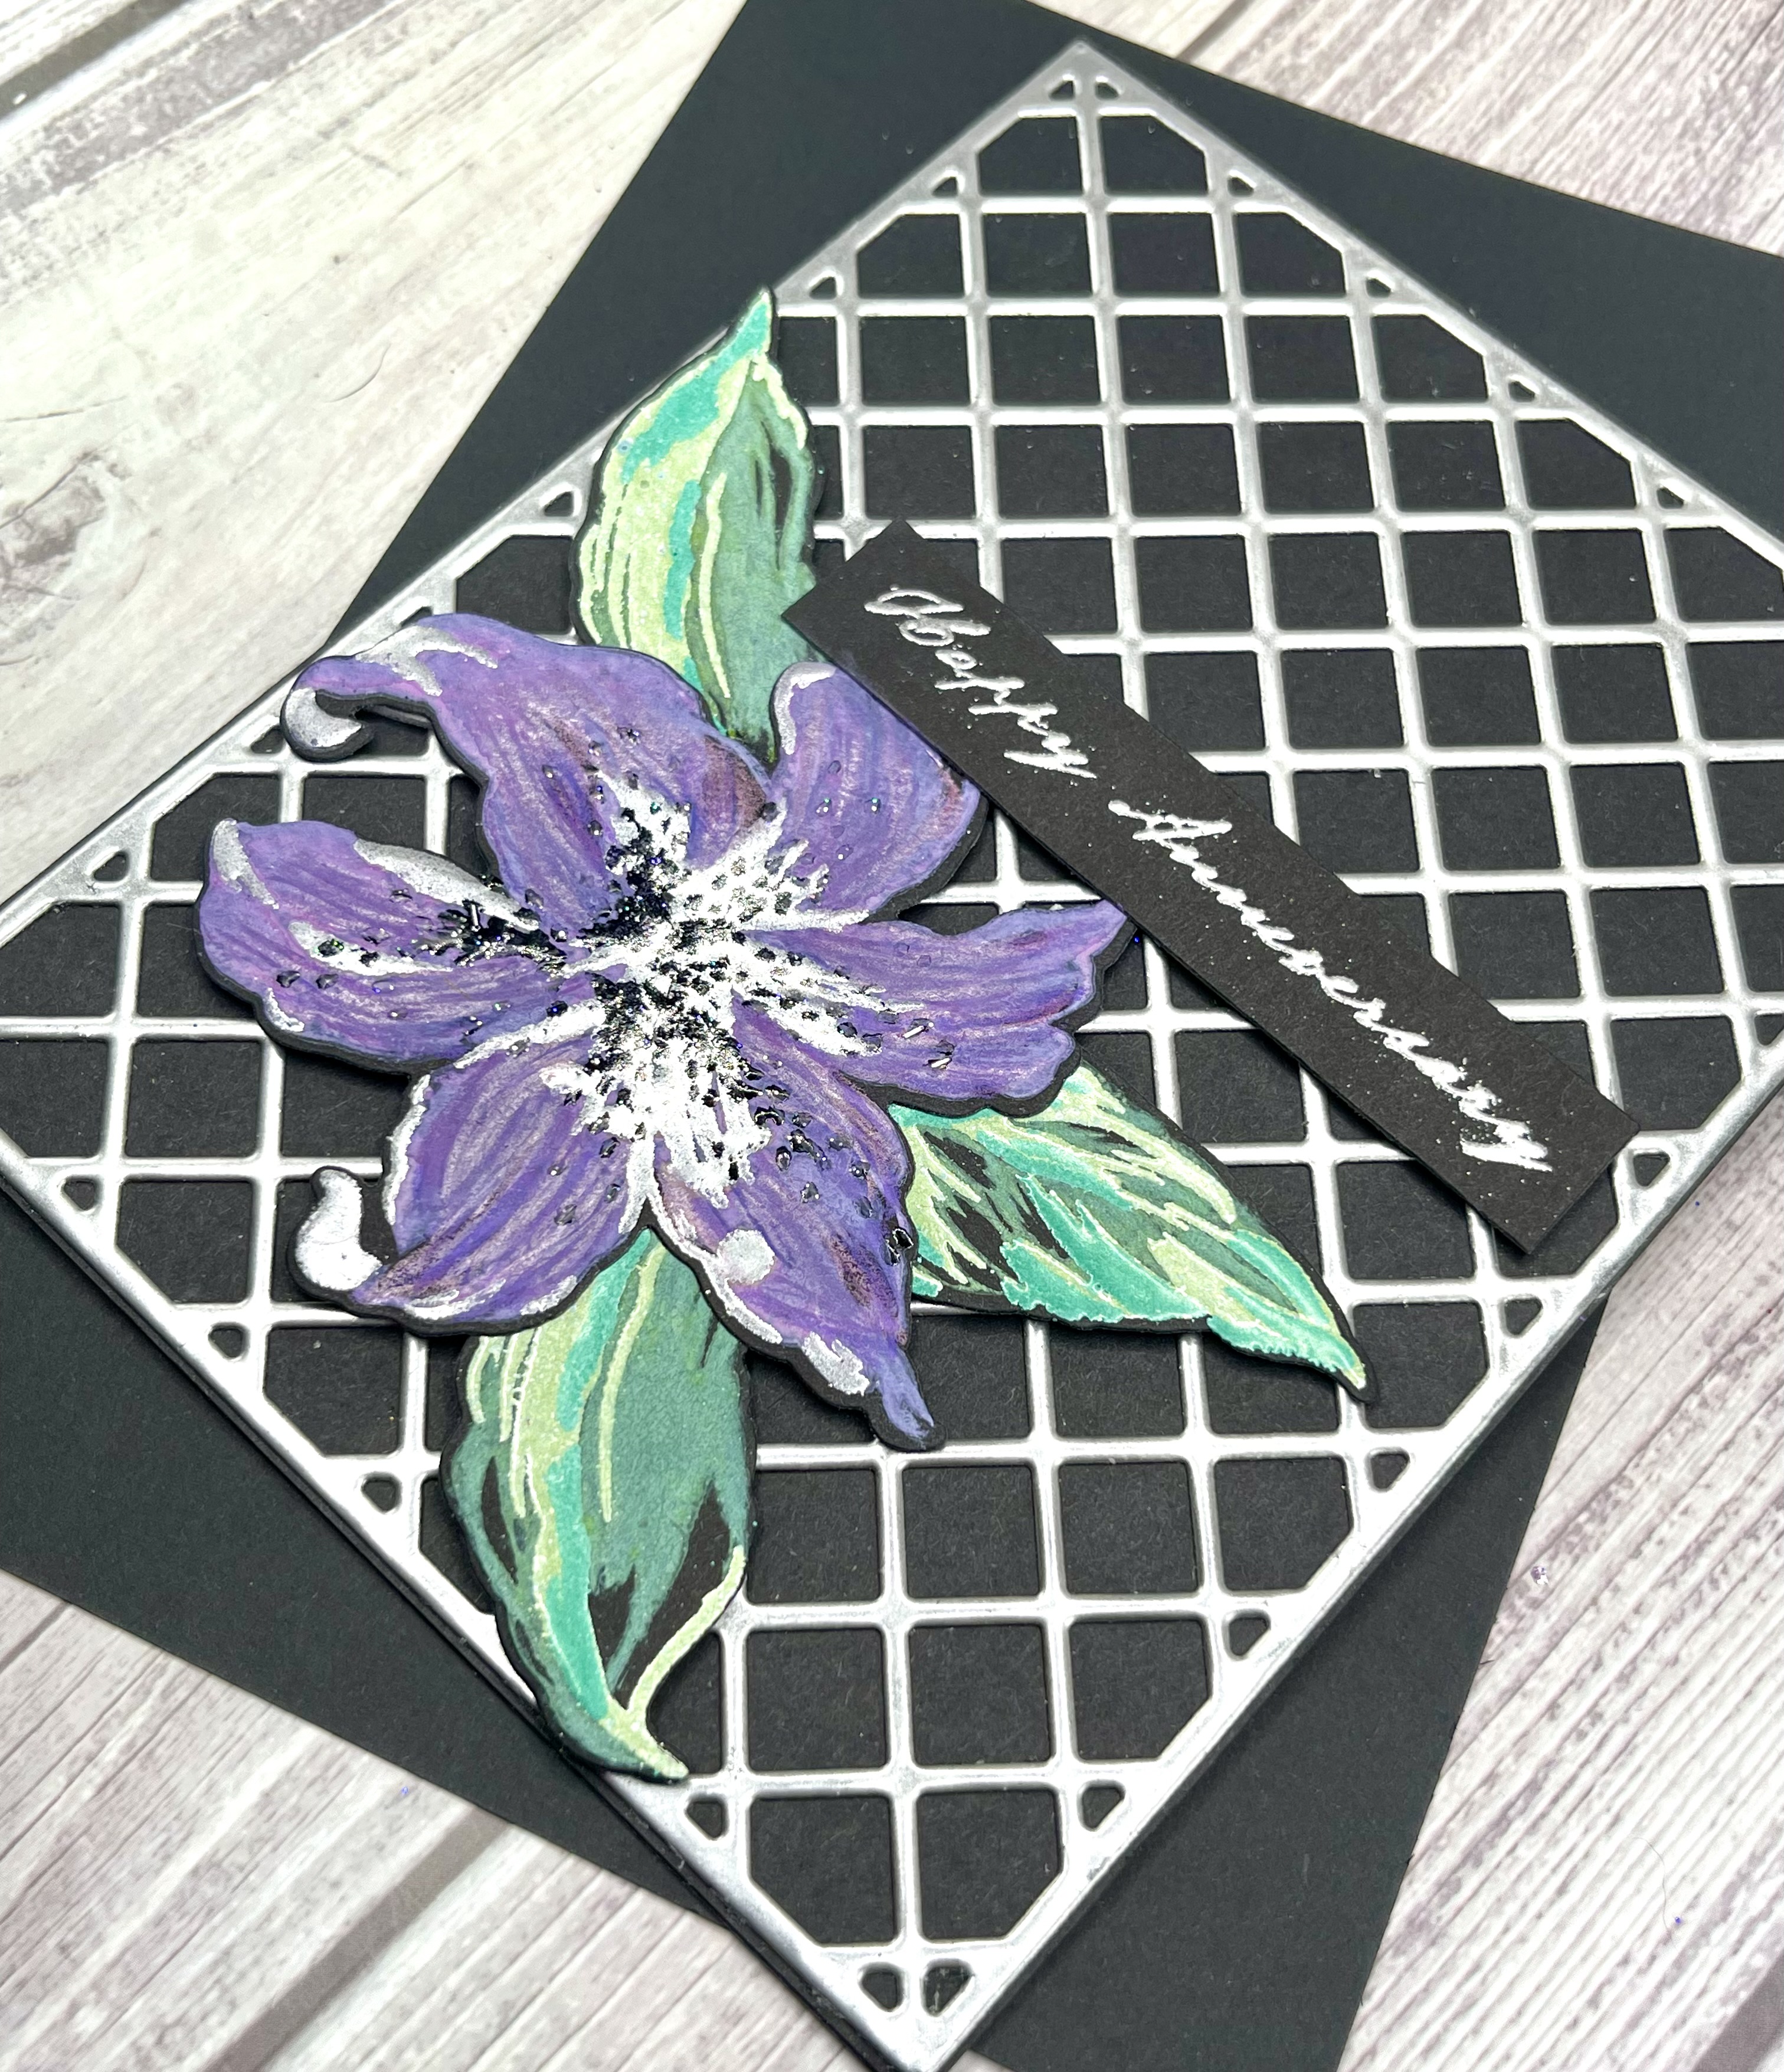
Trellis Card:
For the Trellis card, I stamped some leaves and the flower
from the Altenew
Build-A-Flower: Stargazer Set. I did this in black on black cardstock. I did some blending of colors on scrap black
to pick what colors to use. I used
distress oxide inks for the first 2 layers of the flower and the first layer of
the leaves.
Then I used embossing powders in different colors for the
next two layers of both the flower and leaves.
I love how the silver looks on the black cardstock.
I then die cut all these pieces. I stamped the Happy Anniversary from the Altenew Vintage Roses
Layering Stamp Set and embossed with sterling powder.
For this card, I used a black cardstock base. I added the trellis that was created in the
previous steps. Then I added the flower,
leaves and sentiment to the card.
I love the colors on this and the embossing powder that
looks like metal on the black.
Ice Cream Card:
For this card, I used a panel of black cardstock and stamped
the outline image from the Altenew
Sweet Love Layering Stamp Set using embossing ink and embossed with clear
powder.
I then did the ice cream image on white cardstock and began
layering. I did not think the off-white
and chocolate scoops had enough contrast as they dried, so I used Copic markers
to add some highlighting and give some contrast.
For the dish and spoon layers, I used sterling embossing
powder and then topped it with a black/silver mix embossing powder. This turned out awesome for the dish and spoon.
I cut my clear embossed panel to just under 4 x 5 ¼. Then I took another black 4 ¼ x 5 ½ card
panel and put embossing ink and sterling powder around the edges to make a back
layer to my card. I put these together.
Then I stamped a sentiment from the Altenew Dynamic
Duo: Treat Yourself set. I again used sterling embossing powder and
put this and the ice cream image (which was fussy cut) on foam and put onto the
card. I love this as a birthday card!!
Light Up Wine Bottle:
For my Upcycled Project, I decided to decorate a wine bottle
that I had saved to use at some time. I
put some mini battery pack lights inside the bottle.
For the image, I stamped the big image from Altenew Sisters of the
Heart Bundle using embossing ink and embossed clear embossing powder on
vellum.
I colored the image using alcohol markers, followed by some
highlighting with colored pencils.
My biggest concern with this project was putting the vellum
on glass and not seeing the adhesive.
I decided to take a foam stamper and add glue by dabbing it
on, all over.
I put this on the bottle
and then decided to color over the image again with color pencils once on the
bottle. This really did cover the
adhesive look and gave me the look I was seeking.
I think this would look awesome on a clear bottle as well,
but this blue bottle was one I had wanted to decorate for my current décor.
If you have any questions on these projects, I did give you
the basics on these projects, but am happy to provide more details as needed. I really enjoyed using so many of the techniques
that I had learned through the classes I have taken so far.
Happy Crafting.
Donna T.
Products Used by Project:
Venice Card:

Altenew Let’s
Go Bundle

Altenew Garden
Trellis Cover Die
Catherine Pooler Ink Pad – Do-Si-Do
Catherine Pooler Ink Pad – Sangria
Catherine Pooler Ink Pad – Sixteen Candles
Catherine Pooler Ink Pad – S’mores
Catherine Pooler Ink Pad – All That Jazz
Catherine Pooler Ink Pad – Over Coffee
Catherine Pooler Ink Pad – Sand Castle
Catherine Pooler Ink Pad – Cranberry Fizz
Catherine Pooler Ink Pad – Fiesta Blue
Catherine Pooler Ink Pad – Midnight
Circle Die Cut
Stamping platform
Blending Brushes
Die Cutting Machine
Embossing Heat Gun
Brutus Monroe Sterling Embossing Powder
WOW Ultra Slow Drying Embossing Ink Pad
Paper Trimmer
8 ½ x 11 Teal Cardstock
Scrap Grey Cardstock
Black A2 Card Panel
Foam Tape
Tape runner
Lake Card:

Altenew Let’s
Go Bundle

Altenew Inspiring
Quotes: Sunshine
Catherine Pooler Ink Pad – Eucalyptus
Catherine Pooler Ink Pad – Matcha
Catherine Pooler Ink Pad – Chiffon
Catherine Pooler Ink Pad – Oh Boy!
Catherine Pooler Ink Pad – All That Jazz
Catherine Pooler Ink Pad – Fiesta Blue
Catherine Pooler Ink Pad – Midnight
Avery Elle Waves Die Cover Plate
Stamping platform
Blending Brushes
Die Cutting Machine
Embossing Heat Gun
Brutus Monroe Gilded Embossing Powder
WOW Ultra Slow Drying Embossing Ink Pad
Paper Trimmer
A2 White Card panel
Pattern Paper from stash
Turquoise A2 Card Panel
Black Cardstock
Tape Runner
Bearly Arts Glue
Trellis Card:

Altenew
Build-A-Flower: Stargazer Set

Altenew Garden
Trellis Cover Die

Altenew
Vintage Roses Layering Stamp Set
Ranger Tim Holtz Distress Oxide Ink – Seedless Preserves
Ranger Tim Holtz Distress Oxide Ink – Dusty Concord
Ranger Tim Holtz Distress Oxide Ink – Mowed Lawn
Stamping platform
Paint Brushes
Die Cutting Machine
Embossing Heat Gun
Brutus Monroe Sterling Embossing Powder
Brutus Monroe Mic Drop Embossing Powder
Delafield Embossing Foil – Emerald Green
Nuvo Embossing Powder – Frayed Leaf
Pink and Main Magic Anti-Static Brush
WOW Ultra Slow Drying Embossing Ink Pad
Berol Prismacolor Colored Pencil – Parma Violet
Berol Prismacolor Colored Pencil – Metallic Purple
Paper Trimmer
A2 White Card panel
Black Cardstock
Tape Runner
Bearly Arts Glue
Ice Cream Card:

Altenew Dynamic
Duo: Treat Yourself

Altenew
Sweet Love Layering Stamp Set
Catherine Pooler Ink – It’s A Girl
Catherine Pooler Ink – Cotton Candy
Catherine Pooler Ink – Whipped Honey
Catherine Pooler Ink – Buttercream
Gina K Designs Ink – Dark Chocolate
Gina K Designs Ink – Charcoal Brown
Copic Markers – E49, E53
Stamping platform
Die Cutting Machine
Embossing Heat Gun
Brutus Monroe Sterling Embossing Powder
Brutus Monroe Milky Way Embossing Powder
Brutus Monroe Icicle Embossing Powder
Pink and Main Magic Anti-Static Brush
WOW Ultra Slow Drying Embossing Ink Pad
Paper Trimmer
A2 White Card panel
Black Cardstock
A2 Card base
Foam Tape
Tape Runner
Bearly Arts Glue
Light up Wine bottle:
.webp)
Altenew
Sisters of the Heart Bundle
Brutus Monroe Embossing Powder – Icicle
WOW! Embossing Pad – Clear Ultra slow Drying
Heat tool
Vellum
Berol Prismacolor pencils – Yellowed Orange, Sunburst
Yellow, Canary Yellow, Orange, Limepeel, Olive Green
Copic Alcohol Markers – E39, G94, G99, Y13, Y17, YR07
Wine Bottle
Battery powered mini light
Bearly Arts Glue
Sponge applicator
Stamping tool


.webp)


