Thursday, April 18, 2024

AECP Level 3 Monoprinting Made Easy


Confession Time – About 9 months ago, I watched a video where the crafter used a Gelli plate to pull some gorgeous background prints.  I was in awe of all this and that same week, I went out and bought a Gelli plate.  And that plate has been sitting in my “to do” basket since.  So, I was very excited to take this course.  But, second confession…….I was procrastinating because I thought this would take forever and be so messy.  I was SO wrong!!!

For this course, I chose three techniques to feature on my blog today.  One was using mica mists for my first 2 cards.  Then I used Ink pads and alcohol ink reinkers for my third card.

Card #1 and #2 – Mica Mists

First, I started by pulling out my Mica Mist sprays.  I made several panels, each looking a bit different.  I did all these in my splatter box with a paper towel under my Gelli plate. 

For my last two panels, I laid down some gold pigment ink and then added the sprays on top of this.  Clean up was fairly simple with a baby wipe between sprays and then mild soap and water afterward. 

My first card used the gold pigment ink with the sprays and was pulled on simple copier paper.  I added a white Altenew Garden Trellis Cover Die on top. 

I then stamped and stenciled using the Altenew Build-A-Garden:  Rosa Gallica set.  I put this in the lower left corner on foam tape.  The sentiment is also from the stamp set and was cut out using a fancy die I had in my stash. 

I love all the shine and sparkle in the background and think this is just really pretty.


The second card using these backgrounds is using the first sheet I pulled on white 100 lb. cardstock.  I used the Altenew Up & Away set.  I stamped the smaller balloon and stenciled the colors for this.  I added some additional colors using my alcohol markers.  I also used my alcohol markers on the couple.  I fussy cut these as I don’t have the dies and adhered these using foam tape. 

I stamped the sentiment from this set directly on my background panel using black ink.  Then I adhered to some colored cardstock and then on the A2 cardbase. 

This is one of my favorite stamp sets with the balloons and think this turned out really great with the wonderful background. 

Products Used:

Card 1:

Altenew Garden Trellis Cover Die

Altenew Build-A-Garden:  Rosa Gallica set

Gold Pigment Ink Pad

Black Dye Ink

Gelli 5x7 Printing Plate

Brutus Monroe Chroma Mist - Sunrise

Ranger/Tim Holtz Distress Spray Stain – Lumberjack Plaid

Ranger/Tim Holtz Distress Mica Stain – Winter Frost

Altenew Crisp Ink Pads – Misty Morning, Nimbus, Coral Bliss, Rhodolite, Red Jasper and Canyon Clay

Hammermill 100 lb. White cardstock

A2 white card base

Copier paper


Card 2:

Altenew Up & Away set

Black Dye Ink

A2 Rust card panel

A2 white card base

Gelli 5x7 Printing Plate

Brutus Monroe Chroma Mist - Sunrise

Ranger/Tim Holtz Distress Spray Stain – Lumberjack Plaid

Ranger/Tim Holtz Distress Mica Stain – Winter Frost

Altenew Crisp Ink Pads – Misty Morning, Nimbus, Red Jasper, Peach Parfait and Dark Chocolate

Altenew Alcohol Markers – B003, B002, B027, BG07 BG09, BG3, C010, C015, G011, TG05, TG07, WG01, WG05, WG07, Y401, Y423, Y514, Y608, Y762, Y817, Y821, Y911, Y932

Hammermill 100 lb. White cardstock


Card #3 – Ink pads and Alcohol Reinkers:

For my third card, I started out doing a little experimenting and then changed directions completely.

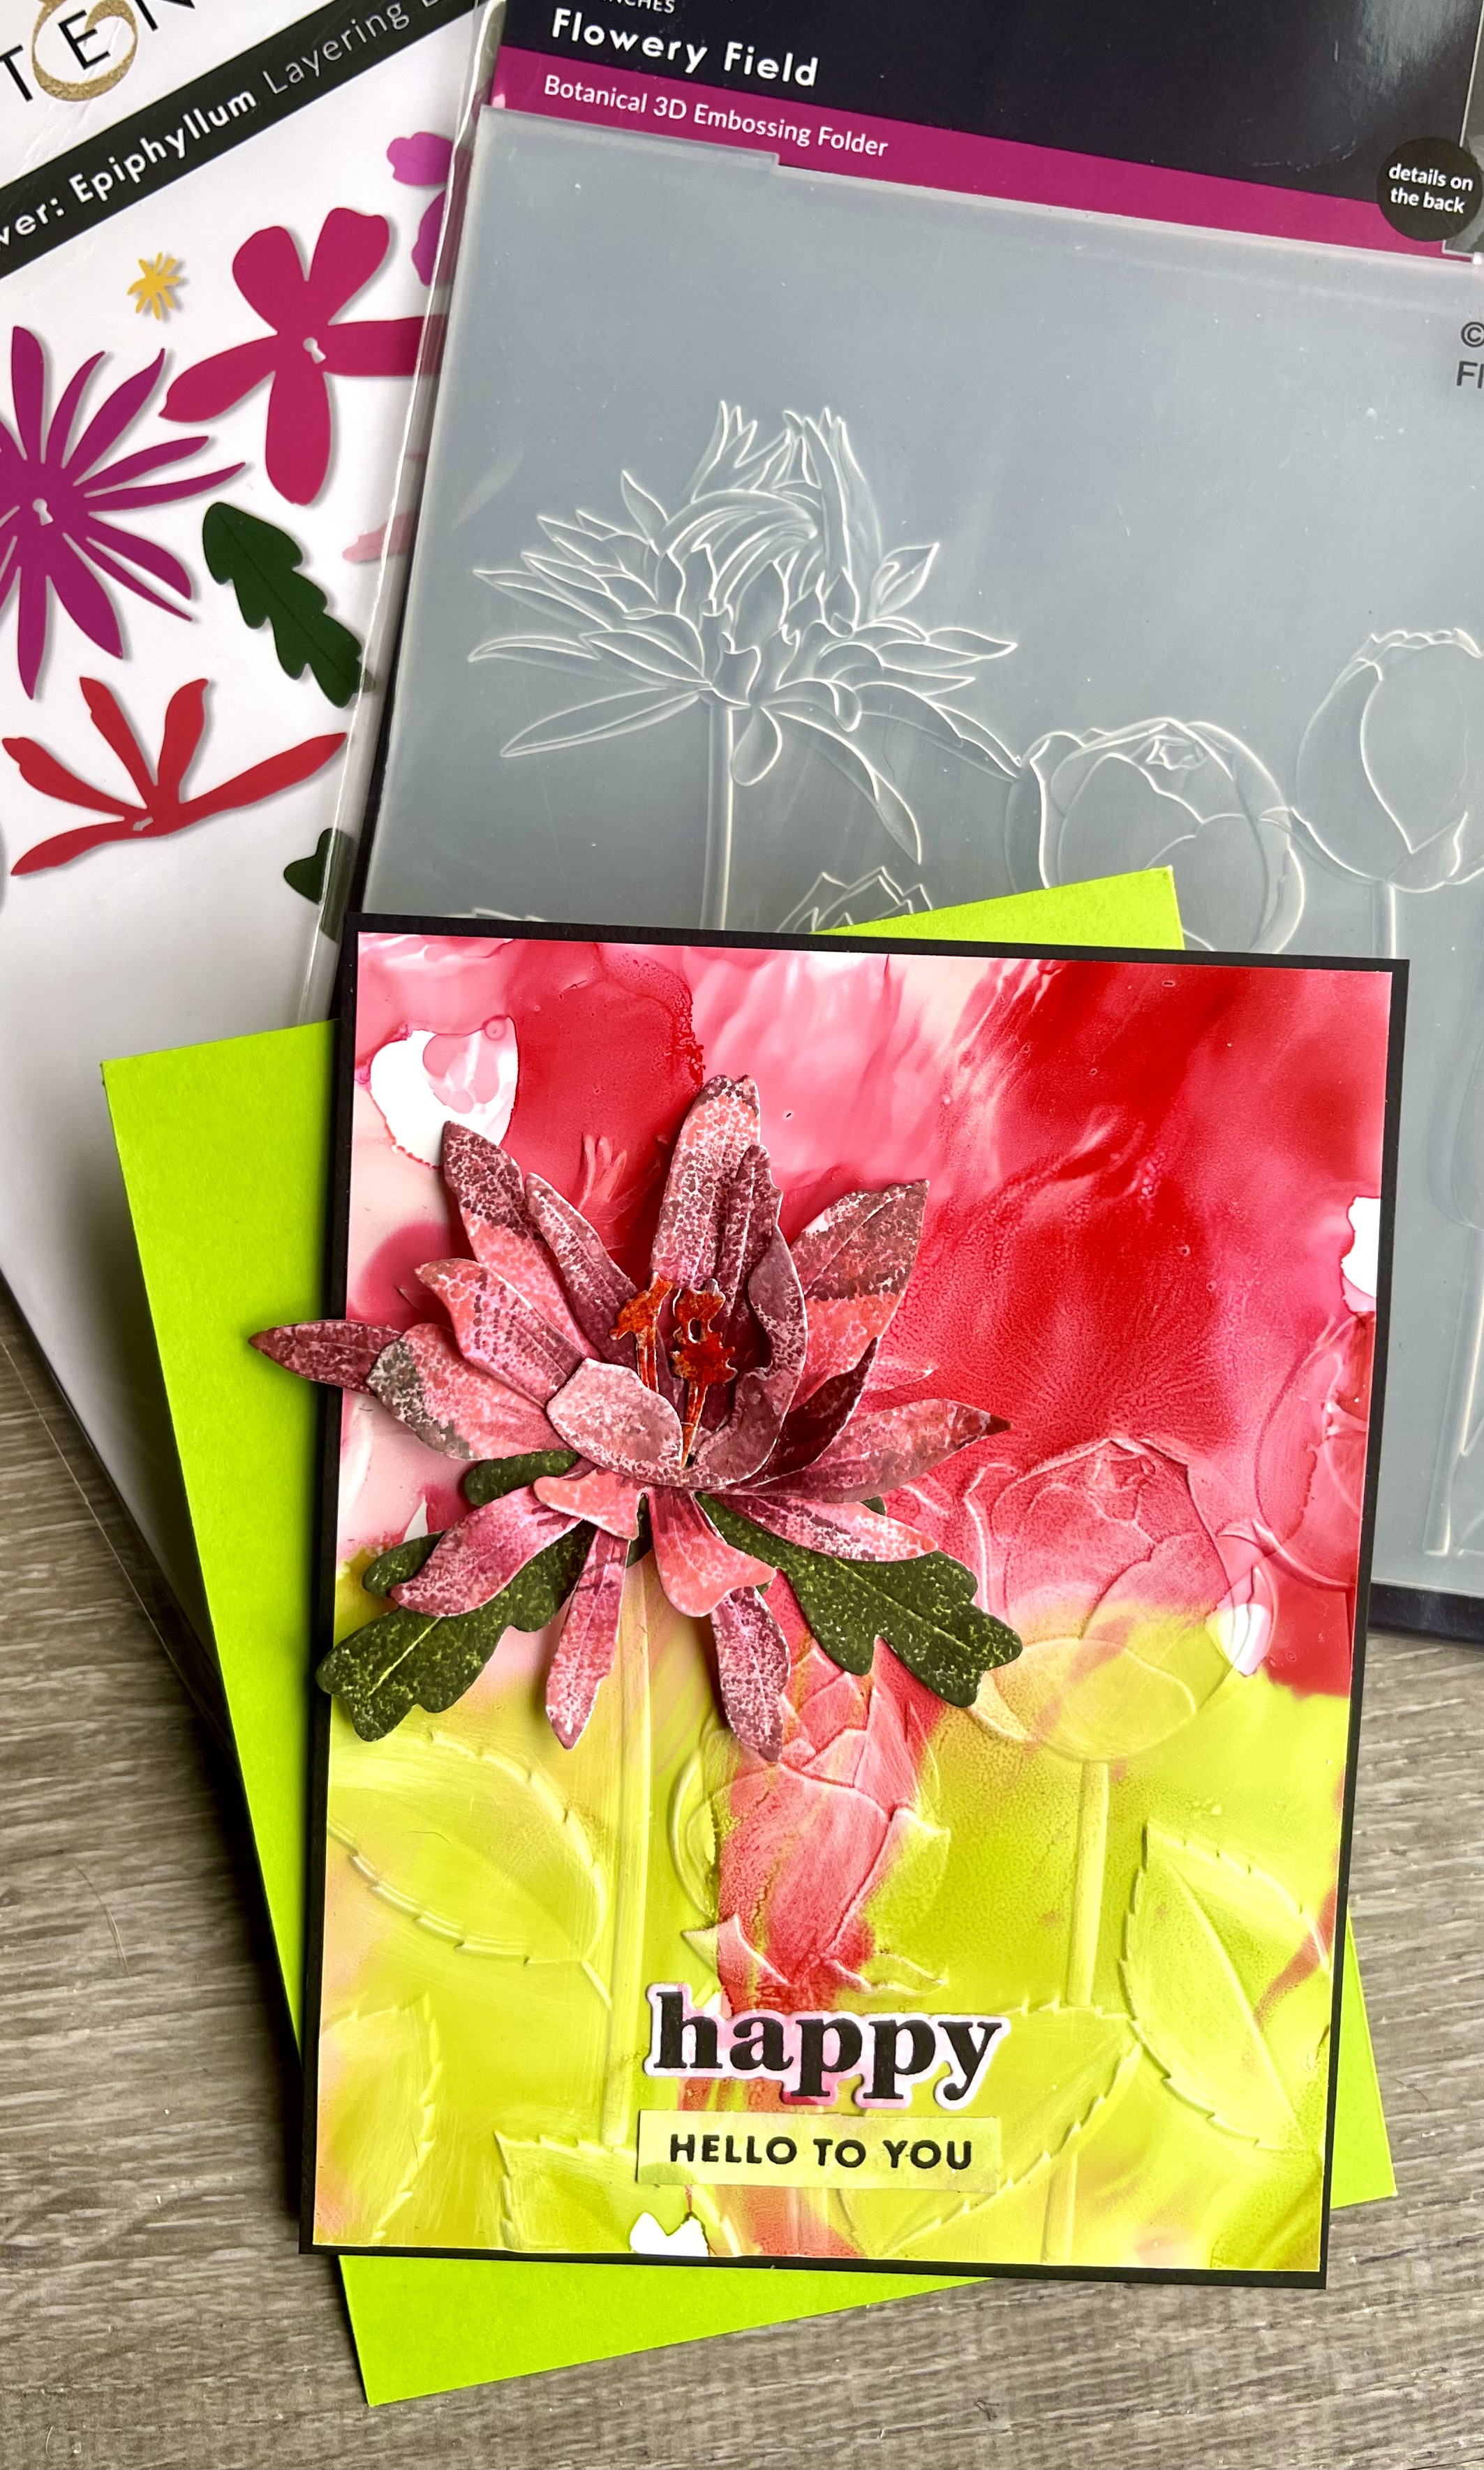
I started by pressing my dye ink pads onto the Gelli plate.  I used green on the bottom 1/3 of the plate and then used my coral/reds at the top.  I spritzed with a little water from my mister.  I then put the die cut pieces from the Altenew Craft-A-Flower: Epiphyllum around the plate (good side facing down into the ink).  I then added a little bit more water and then covered with some cardstock and rubbed firmly. 

When I removed the cardstock, I had something interesting, but not exactly what I was looking for.  However, when I removed the die cut pieces, an idea started forming.  I repeated the process, using the remaining die cut pieces and any parts of the previous flower parts that did not get inked.  I used copier paper this time, but not really for any reason except that I might not be using that pulled print.  I really like how these flower pieces were looking.  However, I still needed a background.

That is when I decided to try the Alcohol reinkers on the Gelli plate.  I cleaned up my plate and then added some drops from my Alcohol reinkers around the plate.  Again, greens on the bottom 1/3 and coral and reds on the top.  I spritzed with a little 91% alcohol to make move a bit and pulled using my cardstock.  And I did not get what I wanted…….I had not really moved the ink around enough. 

So, I decided to try again.  This time I added a bit more alcohol and moved my plate around a bit so the color moved around.  I also changed up my paper to use my Craft Plastic as it will move a little on there as well and this turned out much better.  Plus I had some ink left on the plate.  I spritzed with alcohol again, moved it a bit and then brought in one of the panels I did previously with the die cuts and added this color on top……it might be something useful in the future.  I ended up doing one last round for good measure and have some really nice panels to work with.

I picked one of my craft plastic panels and used the Altenew Flowery Field Embossing Folder.  I love how this looked, but decided to use my sanding block lightly over the raised areas to give a little more definition.  It is very subtle, but I think it makes a big difference in the end. 

I then went back to my die cut pieces and added a bit of shading using my Alcohol markers.

I put these die cut pieces together making the flowers and ended up using one on top of the similar embossed image on my panel.  I love how this flower pops out of the card!!.


Products Used: 

Altenew Craft-A-Flower: Epiphyllum

Altenew Flowery Field Embossing Folder

Craft Plastic

A2 Black card panel

A2 white card base

Black Dye Ink

91% alcohol

Mister bottle

Sanding Block

Altenew Crisp Ink Pads – Coral Bliss, Rhodolite, Green Opal and Green Onyx

Altenew Alcohol Reinkers – G804, G915, R302, R304, R318

Altenew Alcohol Markers – G804, G915, R302, R304, R318, R335


I loved experimenting with these products and am looking forward to doing a lot more experiments. 

Happy Crafting.

Donna T.

Sunday, April 14, 2024

AECP Level 3 - Rethink Reinkers

I was so excited to take this class.  I have a lot of reinkers for both my ink pads and for my alcohol markers.  This class gave me some great ideas on how I can use these to make wonderful backgrounds for my cards.  And you can match colors easily by doing this.

I decided to make one card using alcohol reinkers and one using dye ink reinkers. 


Card #1 – Alcohol Reinkers 

For my first card, I used the Altenew Chestnut Tree Layering Die Set.  And instead of doing just a background, I also created panels to use in die cutting this tree.  I used Craft Plastic for my “paper” because I did not have any Yupo paper and this was great surface for the inks to sit on rather than soaking quickly into the paper.


The process I used for this was that I cut panels for each layer so I could do different colors.  I also cut a 5 ½ x 4 ¼ panel for my background as well.  I used my swatch sheet to look for colors for each layer.


I dropped a few drops of each color I chose for that panel around the panel.  Since this is plastic, the alcohol ink sat in place.  I then sprayed the panel with 91% alcohol to get the ink moving.  I also used an Alcohol Ink Blower to move the ink around more.


As the ink dried, I would add more ink in areas where it was lacking and repeat the process.  However, once the ink dries and you spritz with alcohol, it pulls the ink back into tiny drops and you need to add quite a bit of alcohol to move it around with the air blower unless you want that pooled up look.  I wanted a smoother look so I moved it around.


The best advice I can give here is to play around with it and practice.  I learned a lot by just trying different patterns, adding ink on top of ink, etc.  The possibilities are endless.


The ink colors (All Altenew Alcohol Reinkers) used for each panel were as follows:


Tree base – Yellow Ochre, Pumpkin Pie, Sicilian Amber and Butternut

Base Layer of leaves – Coral Bliss, Fresh Lemon and Parrot


Second Layer of leaves – Vanilla Cream, Coral Berry, Heart Beat and Autumn Blaze


Top Layer of leaves – Pink Pearl, Maple Yello, Citrus Burst and Frosty Pink

A2 Panel background – Sea Glass, Iceberg, Eastern Sky, Frayed Leaf, Firefly and Grass Field


After all panels were what I wanted, I let them dry and then die cut them.  I ran them through my die cut machine 3 times and was very careful in removing to not tear anything.  If any ink was left on my dies, I used alcohol to clean it up, as well as using alcohol to clean up my glass mat.


This die set used the key hole system which allow you to match the key hole to perfectly layer you die cuts.  I popped up the second layer of leaves with foam tape to give the whole thing a little dimension.


For the sentiment, I used the Altenew Bold Thanks Die Set.  I cut the shadow from some brown cardstock and the letters from some left overs from making the tree.  I added a few leaves confetti from my stash and although they are maple leaves, I think they look awesome and really add to the fall feel!


I did end up cutting my A2 panel to 5 ¼ x 4 and mounted on a white note card base.


This card was so fun to make.  I can’t wait to try more of these types of cards using my alcohol reinkers!!!


Products Used:

Altenew Chestnut Tree Layering Die Set

Altenew Bold Thanks Die Set

Altenew Alcohol Reinkers - Yellow Ochre, Pumpkin Pie, Sicilian Amber, Butternut, Coral Bliss, Fresh Lemon, Parrot, Vanilla Cream, Coral Berry, Heart Beat, Autumn Blaze, Pink Pearl, Maple Yello, Citrus Burst, Frosty Pink, Sea Glass, Iceberg, Eastern Sky, Frayed Leaf, Firefly and Grass Field

Craft Plastic

Alcohol Ink Air Blower

Maple Leaf Confetti

White A2 card base

Brown cardstock from stash

Bearly Art Glue

Foam Tape


Card #2:

For my second card, I used dye ink reinkers.  As I started working on my design, I really stepped out of my norm for this.


I started by using the Altenew Rose Buds Stencil and Die Set.  I stenciled these flowers and realized quickly, they were certainly different than the soft flowers I usually do.  I see these as more Pop Art flowers (at least by my personal definition).  And I did not know what to do with them.  I die cut them out and set them aside.


I started flipping through my Altenew supplies and found an older paper pad I had.  This particular paper really spoke to me as coordinating with the pinks and purples I had used.  It had a huge black area (almost like an eye) in the middle, so I got the idea of creating a panel for the middle of my card.


So I got out my dye based reinkers in pinks, purples and a light blue.  I put a couple of drops of each color on my glass mat and also put some water on my surface.  I used a small brayer to pick up some water, then some dye ink and then rolled it onto an A2 white card panel.  I repeated this with each color, making a very interesting panel. 


Before cleaning up each color, I dipped a second A2 white panel to clean up the left over ink, so I have a bonus panel to use later.


I felt my panel had some good colors to tie my flowers to my background panel, so I decided to tear the edges and then I added embossing ink to the edges.  I embossed using a light pink embossing powder.  Then I used the “for you” sentiment from the Altenew Handmade Tags Stamp Set.  I embossed using sparkly black embossing powder.


I cut my background panel to 5 3/8 x 4 1/8 and attached to a white card base.  Then I glued my inked and embossed panel onto that.  Next I popped up the flowers on foam tape.  Last, I added some light purple confetti for a little added pop.


This project was definitely a stretch.  Overall, I like how it turned out and I have the perfect person I plan to send this too.  They will love all the colors!  Will I do something like this again?  Who knows.  I love the reinker panel, but the pop art look may just not be my style.  However, I do believe our style evolves over time, so this may be a step to the next change in mine.  LOL.


Products Used:

Altenew Rose Buds Stencil and Die Set

Altenew Handmade Tags Stamp Set

Hammermill White 100 lb. Cardstock

A2 white card base

Catherine Pooler Ink Pads - Grape Crush, Pixie Dust, Cotton Candy, Party Dress, Lime Rickey, Grass Skirt

Catherine Pooler Reinkers – Grape Crush, Pixie Dust, Cotton Candy, Party Dress, Cummerbund

Brutus Monroe Mic Drop Embossing Powder

Brutus Monroe Light Pink Embossing Powder

Brutus Monroe Embossing Ink

Light Purple confetti

Bearly Art Glue


I hope you will try using more of your reinkers outside of the traditional use.  Experiment and have fun, I know I plan to do lots more experimenting!!


Happy Crafting.

Donna T.

Wednesday, April 3, 2024

Rainbow Color Challenges

Today, I wanted to share a couple of color challenges that I completed this week.

The first is the My Favorite Things Color Challenge #233.  The first thing I thought of when I saw this challenge was a rainbow.


I made two cards in this color palette.  The first started with the Romantic Script Background stamp from My Favorite Things.  I added Distress Oxide colors in Picked Raspberry, Squeezed Lemonade, Carved Pumpkin and Salvaged Patina down the stamp, overlapping along the way.  I ended up with Picked Raspberry on my Squeezed Lemonade pad and had to wipe it off to clean it up, so maybe use your lightest and work to darkest.  I also found that my Carved Pumpkin kind of overtook my Squeezed Lemonade in the image once it was stamped.

However, to fix this, I just cut down my panel and added Squeezed Lemonade lightly around the edges which I really liked.  I then stamped images and a sentiment from the Smitten Kitten stamp set.  I colored these with alcohol markers and blended more Squeezed Lemonade over the sentiment.  After die cutting my images, it was time to assemble.

I think this card turned out really sweet and I really enjoyed using this color palette.  So much so, that I did a second card.

This time, I ink blended with the same colors on a panel.  Once this was done, I took a little water and flicked it on the card, let it sit and then put a paper towel to dry up any excess.  This gives us some great spots on the colors.  I again used the Smitten Kitten stamp set for my image and sentiment.  I colored with alcohol markers and die cut the kitten.  I die cut the "blanket" from a die cut I had for the kitten to lay on.  Then I took some small pieces of paper towel, folded them and glued them along the bottom to look like tissues.

Again, a really cute and easy card to put together.


The second color challenge I did was from the April Color Palette Challenge for Kendra's Card Challenges (Cards By Kendra (google.com).  The color palette is #187 in Sarah Renae Clark's Color Box.

Again, I immediately thought of a rainbow, so I ink blended the following Distress Oxides:  Picked Raspberry, Seedless Preserves, Peacock Feathers, Salvaged Patina and Lucky Clover on a white card panel.  Next, I splattered using Brutus Monroe's Gilded Shimmer Splash.  I then took a balloon and stars stencil from Photoplay and added embossing ink.  Then I embossed using Brutus Monroe's Icicle (clear) embossing powder.  This gave a great tone on tone look.

Then I stamped an image from the My Favorite Things Furever Friends stamp set and a sentiment and heart from their Smitten Kitten stamp set.  I used alcohol markers to color the images.  I used a black marker to outline the sentiment strip.  I then added all this on foam tape and put on my card.  I think this makes such a great birthday card!!!

Hope you enjoyed these color challenge explanations.  I know I sure enjoy doing them!!

I will be entering the first 2 images in the My Favorite Things Color Challenge.

I will be entering the last image in the Kendra's Card Challenges (KCC) April Color Palette Challenge and in the Simon Says Stamp Wednesday Challenge based on birthdays.

Happy Crafting!

Donna T.


AECP Level 3 Botanical Illustration Inspired Watercolor

When I was picking my final classes, this class was something that I really wanted to take, but really scared me.  I’ve never been a painter...