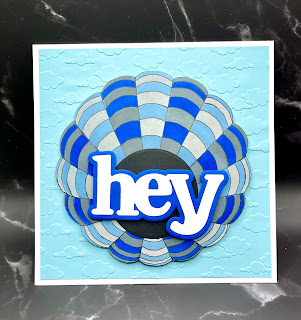
Today's AECP course was called, "For the Guys" and provided some great ideas for creating cards for the men and boys in our lives. These tend to be the hardest cards for me to come up with, so these ideas were welcomed and a lot of fun.
But even after watching the videos, I thought for a bit on what I would make. I came up with a hot air balloon stencil as we just had the Balloon Glow and Balloon Races here in my part of the US. I really enjoy these events and there is usually something for everyone - guys and girls.
I started by picking 4 colors for my balloon and using the Altenew Up & Away Stencil Set (Stamps and Dies are also available), I layered on the colors on a 6 x 6" white card panel. After I was finished, I realized that I really wanted my darker two colors to be diagonal from each other and I wanted the greys to be in a row and blues in a row. So, I decided to do another round of stenciling, making a second balloon.
Two things were realized at this point. First was, I had some white areas between colors. Somehow I don't have the stamp in my stash, so I decided to take an artliner and just draw around the entire image and each color on the balloon (just like a stamp would have left an image). At first, I was nervous, but as I continued, I realized, it was quite easy and I did better if I kept a good steady pace and not worrying about making a mistake.
Once the outlining was done, came my second realization......I liked my first image as much as the second anyway. My need to put the darker colors diagonal did not make as big of a difference as I had thought.
Now, we had the big white "blob" to deal with which would have been ropes and the basket on the stamped image. I briefly considered trying to draw this in, but quickly decided that was not something I could do. So, I decided to cut a black 2 1/4" circle and just cover that area. I really like how this turned out.
Next came the background, as I did not want just a white background. For one image, I fussy cut the balloon. Then I took some light blue cardstock and used the Cloudy Day embossing folder to make a cloud background. I then put the balloon on foam tape and put on top of this panel which I trimmed down to 5 3/4 x 5 3/4" to get rid of the edges that did not have the embossing.
For my other image, I took the Cloud Stencil and laid it across an area at the top. I used my blue blending brush and lightly blended color onto the paper. I used only the ink that was left in the brush and did not add any ink while doing this background. On the second layer, I had to also lightly blend above the balloon. I continued making clouds all the way down the panel. I really liked how this turned out. I trimmed it down to 5 3/4 x 5 3/4" as well.
My final steps were to find some blue and white cardstock in my scrap bin. I cut out the shadow and the word "hey" out of each and layered them. I put this sentiment on foam tape and attached it to the image on top of the black circle. Then I put the panel onto a 6 x 6" card base, using foam on the stenciled cloud card panel and only double sided tape on the light blue panel.
I am really pleased on how these two cards turned out and I think they would be a great card for any guy in your life. I hope you enjoyed today's card.
Donna T
Products Used:
Altenew Up & Away Stencil Set (Stamps and Dies are also available)
My Favorite Things Cloud Stencil
Pink and Main Cloudy Day Embossing Folder
Hey Die Set - word and shadow
Catherine Pooler Ink - Stone Blue, Pebble, Slate and Suede Shoes
Spectrum Noir Artliner - 0.3


FANTASTIC!!
ReplyDelete