Sunday, October 29, 2023

AECP Level 1 - Final Challenge Part 2 - Feminine Cards


Welcome back to part 2 of my Final Challenge for Level 1 of AECP - Feminine Cards.  As stated in part 1, we were challenged to make a gift set of cards with packaging and this time, they should be feminine.

For this challenge, I utilized some of these techniques:

  • Layering - I layered some of my images after cutting them out.  I also used a layering stencil for all my flowers.
  • Clean and Simple Boutique Cards - I utilized some specialty Luxury paper and I also made an anniversary card that was very clean and simple.
  • Let it Shine - I utilized shimmer and sparkle, used embellishments and used metallic paper.
Let's take a look at my process and my overall project I made.

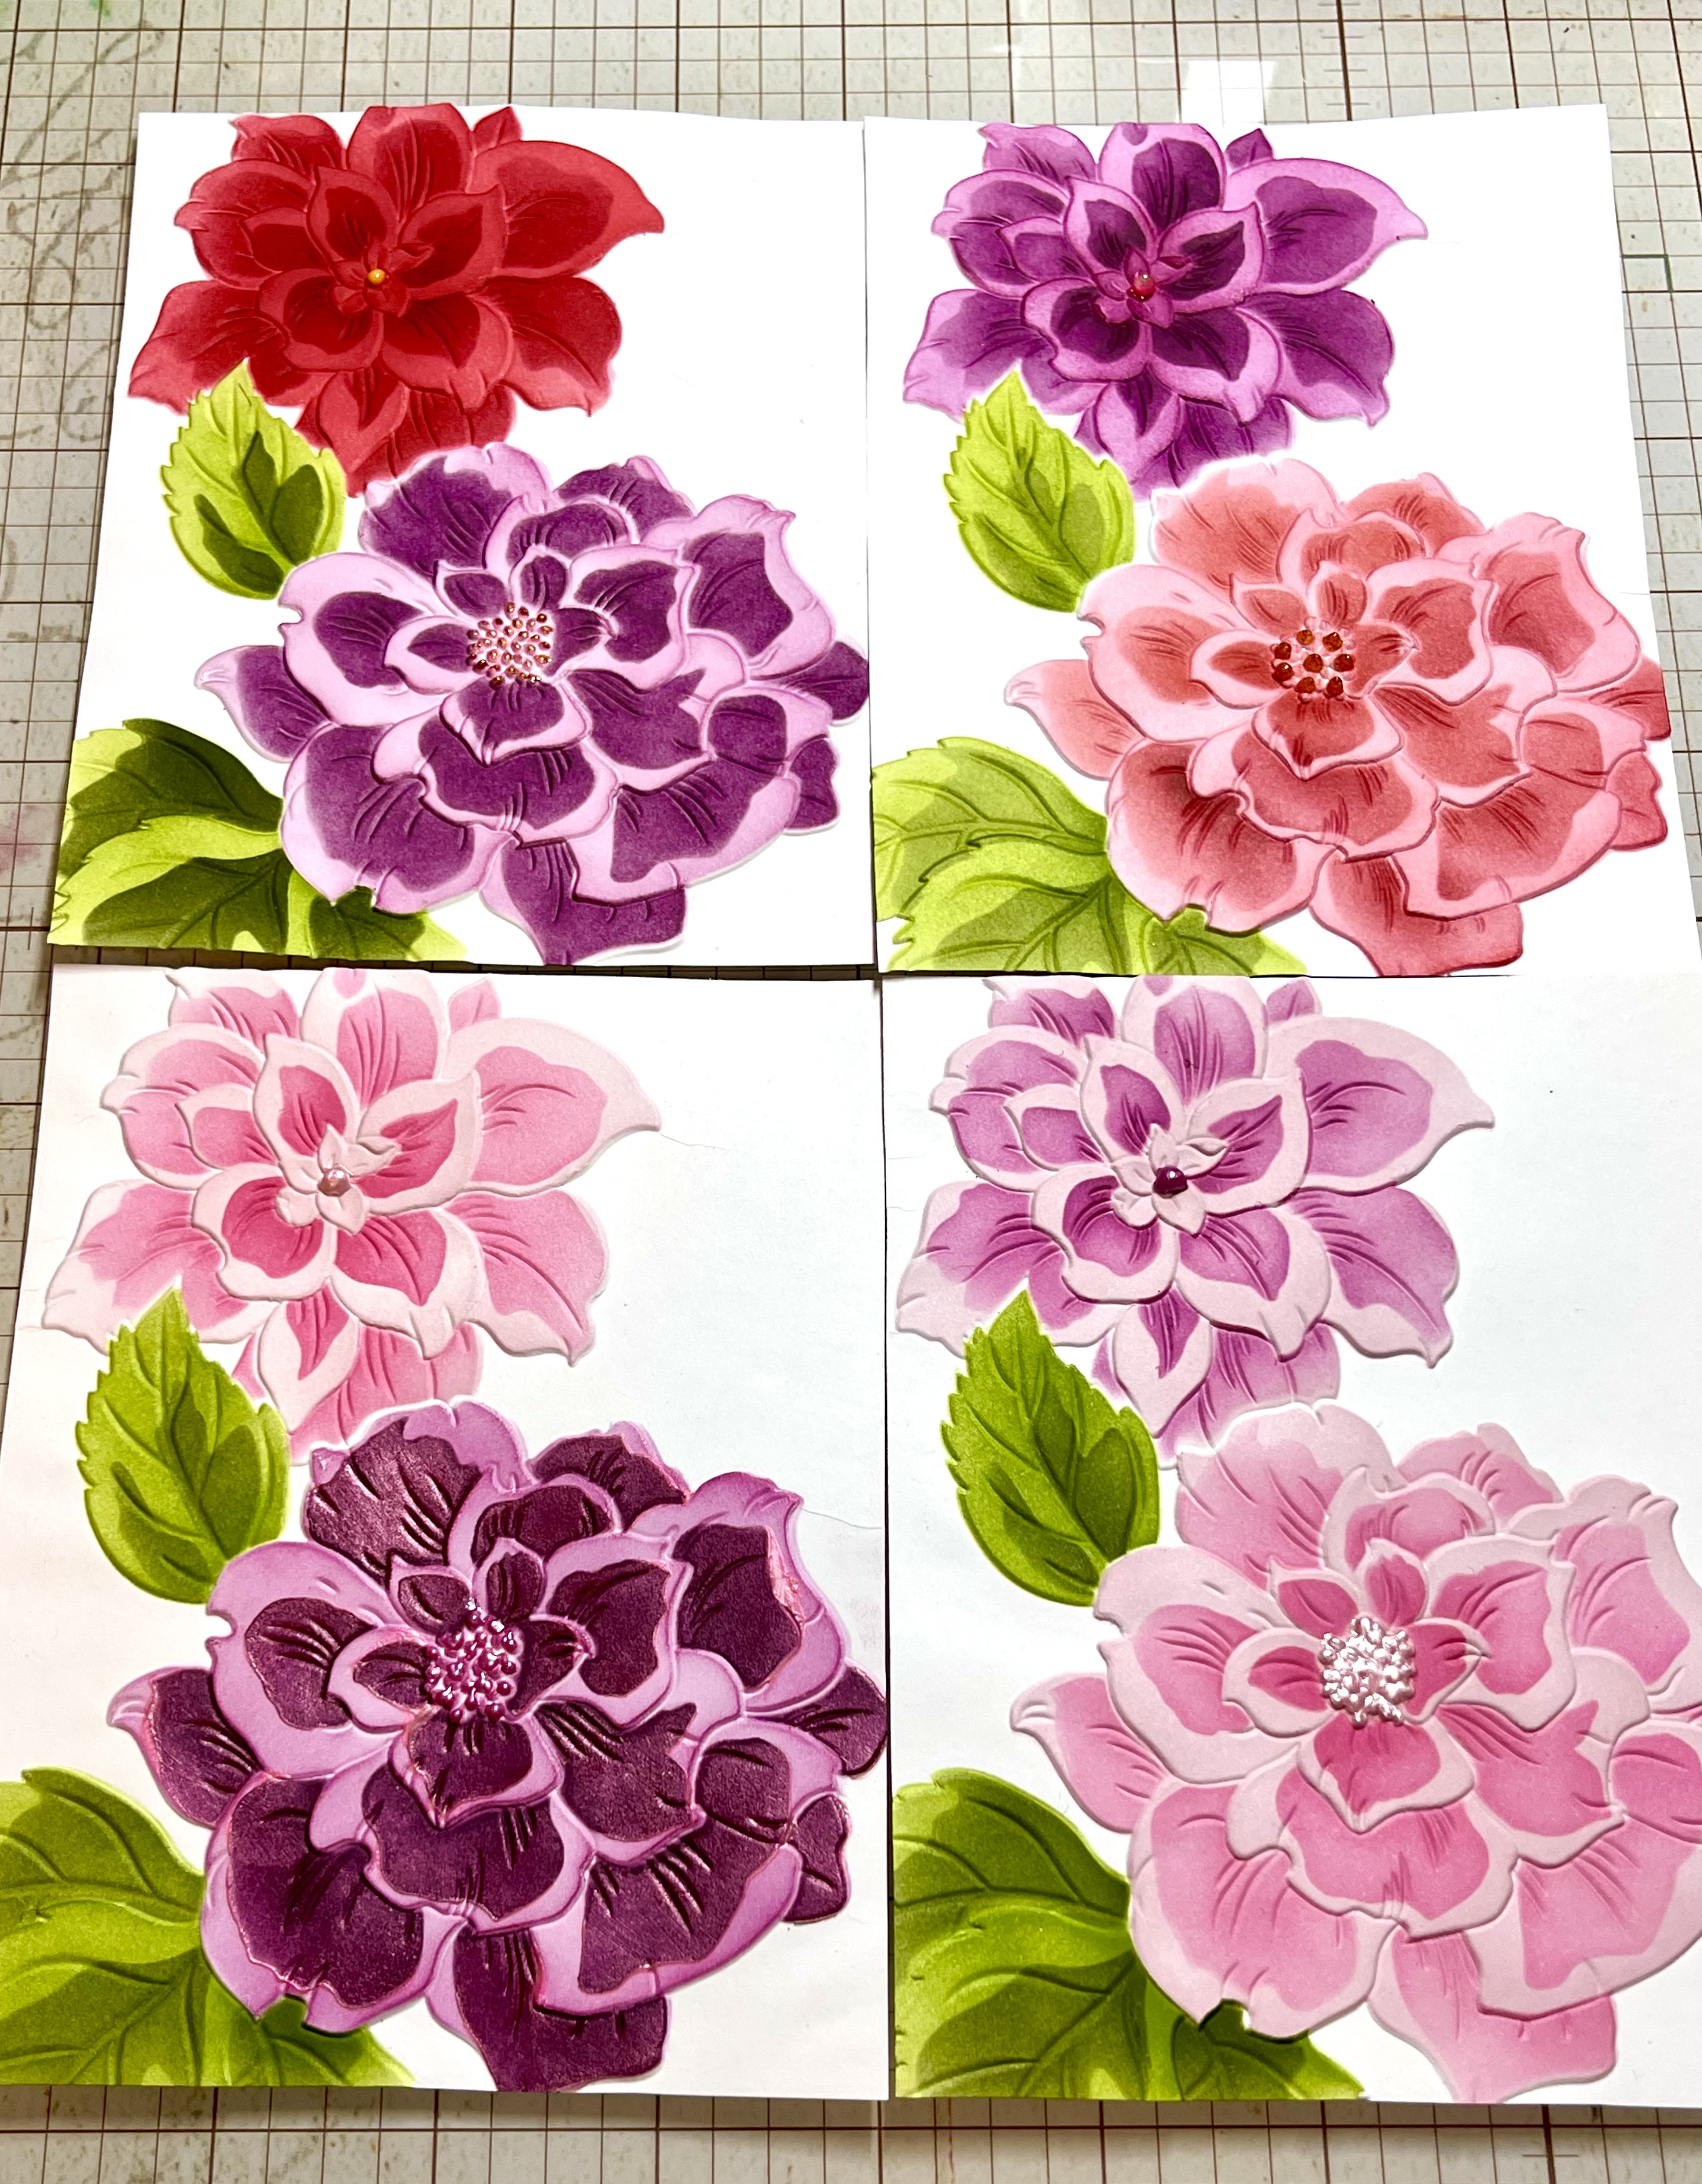
I started with the Altenew Sunshine Blossoms & Courageous You Bundle, using the Sunshine Blossoms 3D embossing folder, I created 4 panels.  I then took the Courageous You stencil set and began stenciling the flowers and the leaves using various colors.  You can see I made sure to mask off openings anywhere close to where I was stenciling as I have a habit of getting carried away and getting ink where it does not belong.  At this point, I did not know which ones I would be cutting out and which ones would stay on the white panel.


On one of my flowers, I got a little heavy handed with the darker color (at least in my opinion), so I decided to add some Cross My Heart Solar Paste on top of that color using a foam blending tool.  This lightened up that color and added some shine.


I then went through and added some Nuvo drops and Stickles to the center area of the flowers.  I did this in several different patterns.  For one flower, I lightly touched each raised area with copper Nuvo drops.


Another technique I learned today from this.  I added my drops too heavily and they were running together, so I decided to just cover the center with one large drop (or glob).  After letting it dry, it came out wonderful as the drops settled into the embossing and made a pattern on their own.


I laid out the 4 panels and started thinking about how I wanted to use the flowers and if any would just be a card by itself.  As you can see, I did one red flower.  I thought I might use it in my set, but ended up not, but did create a bonus card which I will show at the end.  Let me show you what I ended up doing.


My first card was simple and clean.  I took the panel, cut it down to 4 x 5 1/4", added to a rose gold card base.  I then stamped a Happy Anniversary sentiment using embossing ink on black cardstock.  I added Alabaster (white) powder and heat embossed.  I added this across the middle.  Added 3 jewels in a triangle (odd numbers are more eye pleasing) and this card was done.


For the rest of the cards, I fussy cut the flowers from the base. 

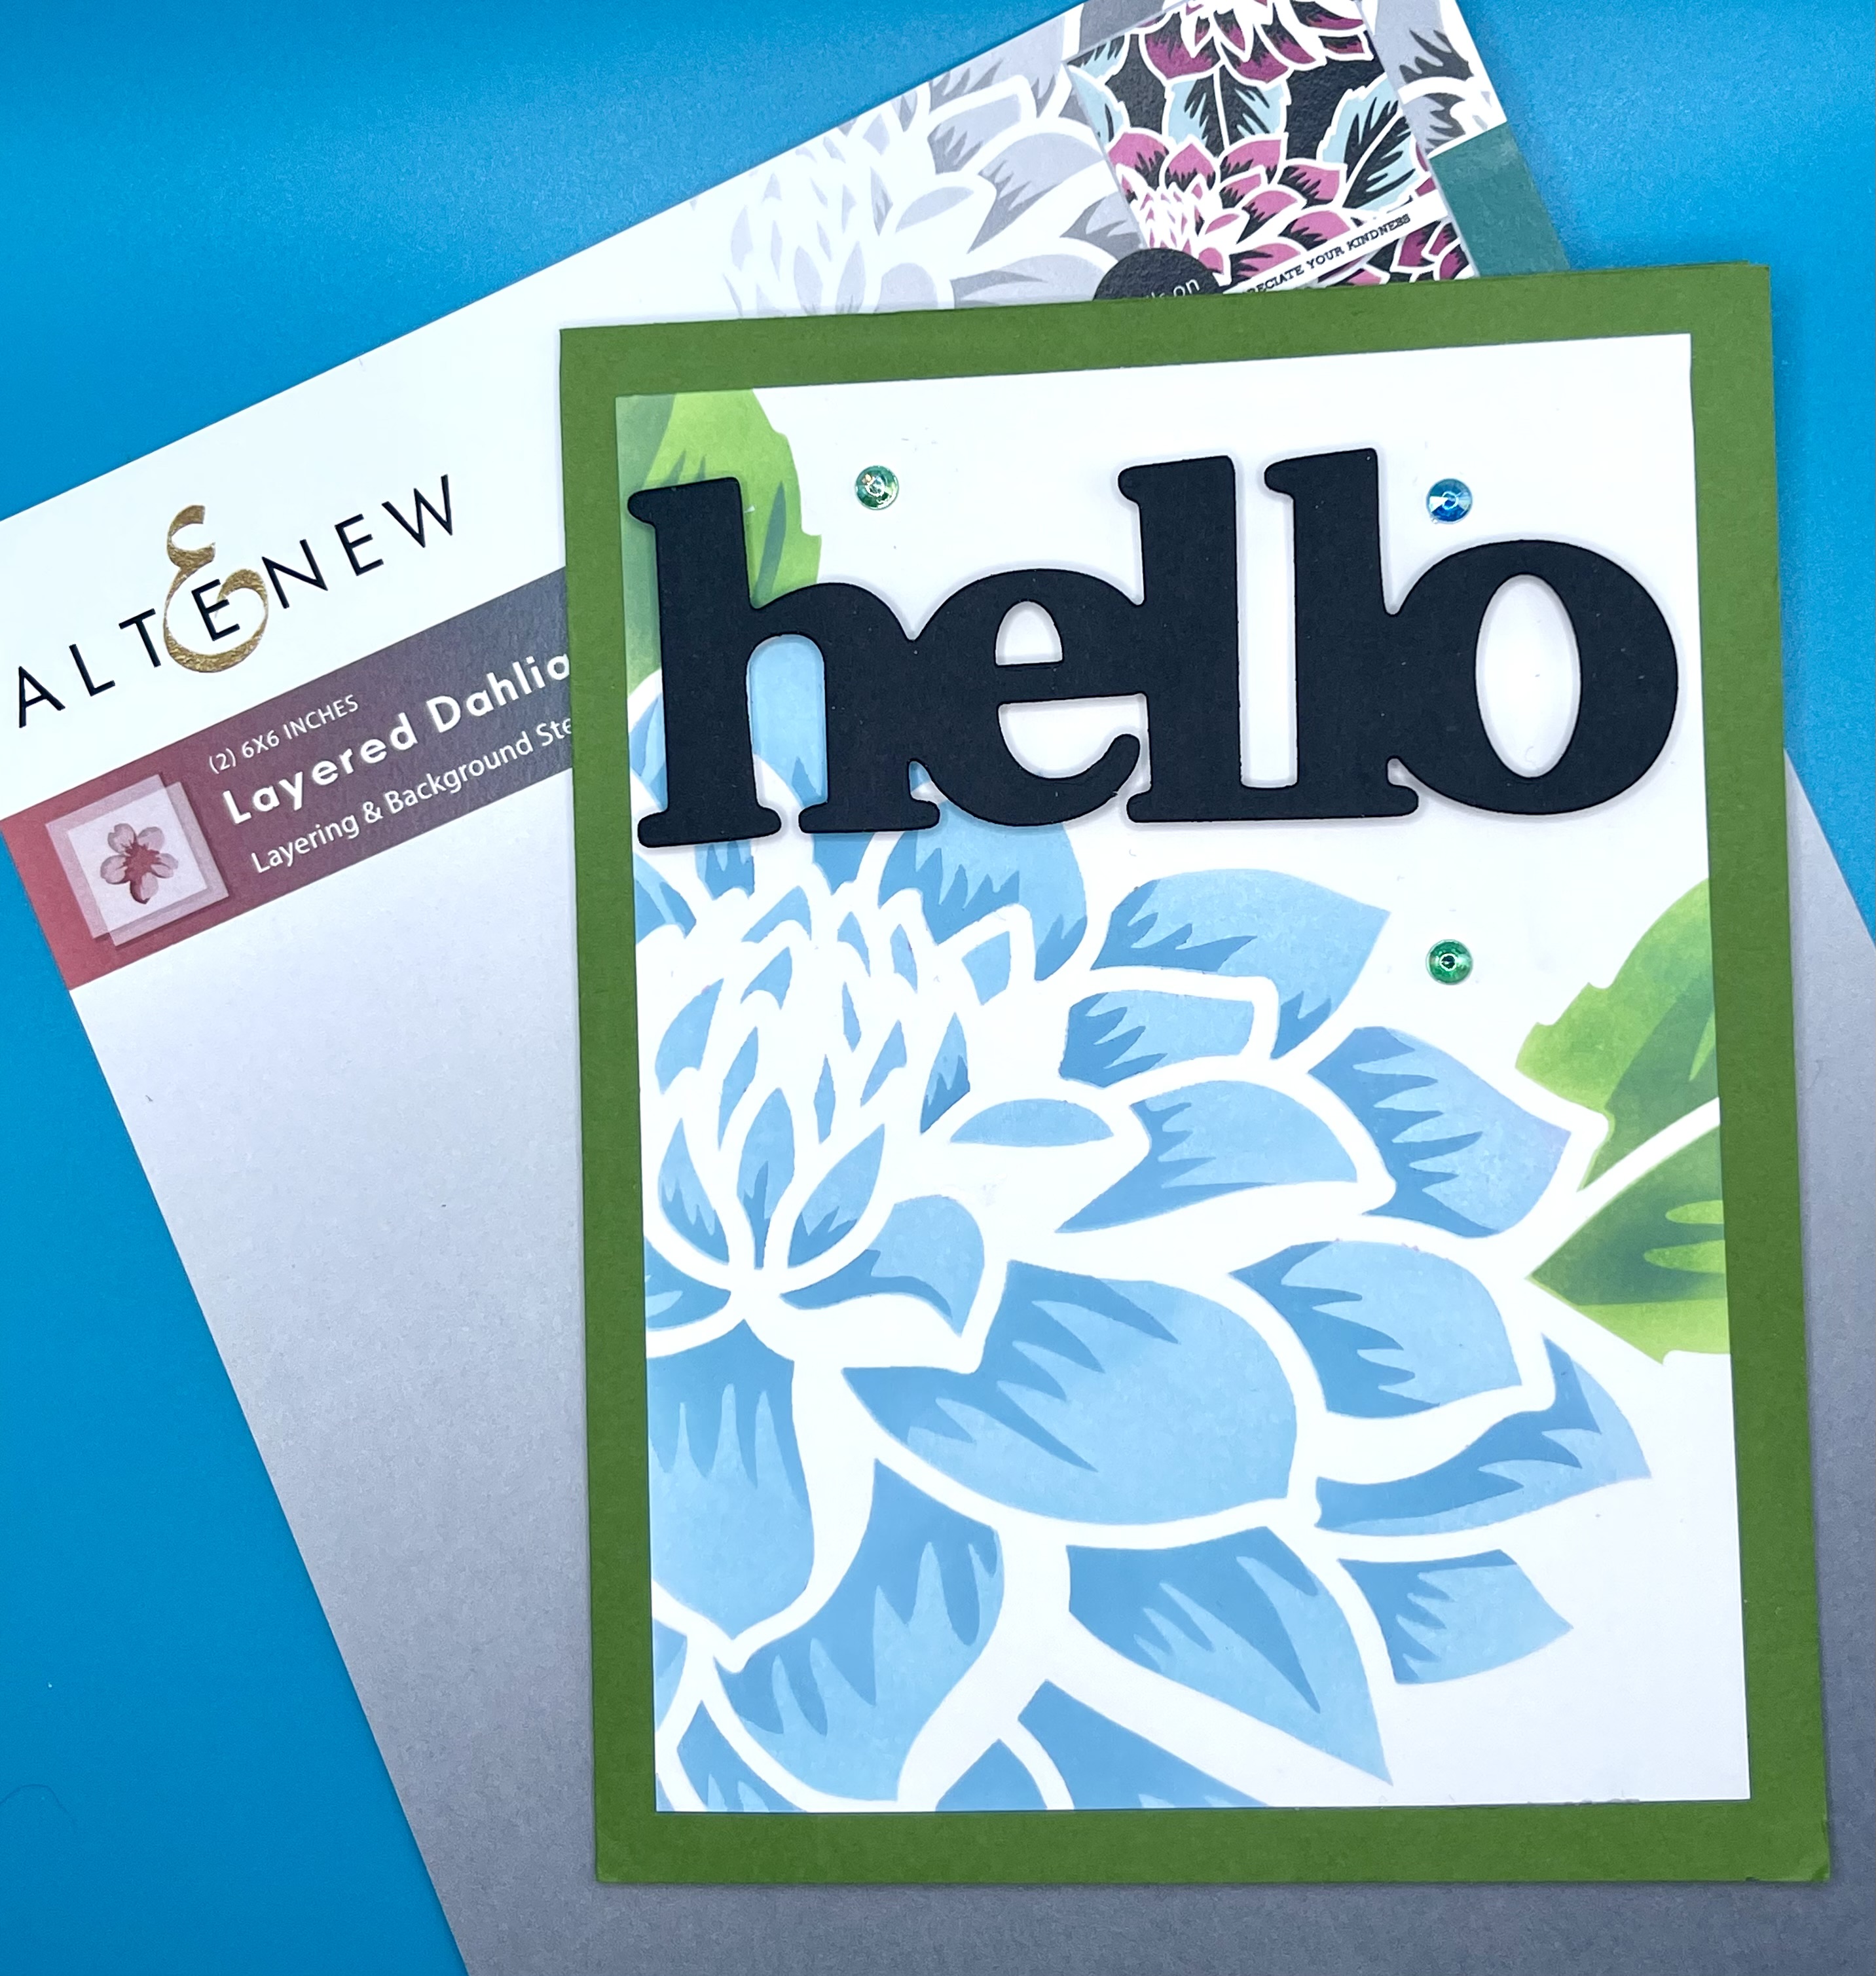
Next, I took a piece of 6x6 paper from the Altenew Wildflower 6x6 Paper Pad and cut it to 4 x 5 1/4".  I thought the colors in this paper really complemented my flower colors.  I picked a large flower for my bottom left corner and a smaller flower to come in from the top right.  I put these on foam tape.  I picked a foiled sentiment I had already in my stash to put on foam on the bottom right.  Then I again added 3 small jewels around the flowers.  Card #2 - done!


For the 3rd card, I fussy cut the flowers, but left these 2 together.  I used an exacto knife to cut out 2 small white areas between the two flowers.  I then took a card base I had in my stash from one of my previous cards in this series.  It was where I had picked up left over ink and let it dry.  I think it looks beautiful as a watercolor background for this card.  I cut this to 4 1/4 x 5 1/2", added the flowers, another foiled sentiment from my stash and 5 round embellishments.


For the last of these cards, I took some card stock and ink blended a background, going from light to dark across the card stock.  I then took a geometric stencil from my stash and added Cross My Heart Solar paste.  Once this was dry, it created a very pretty background.  This was cut to 4 x 5 1/4"  I added my flower to the bottom left corner and put a foiled sentiment in the top right (both on foam tape).  This panel was put on an orchid color A2 card base.  For my embellishments, I used some shiny hearts in various sizes.


For my packaging, I really wanted to do something similar to what I did in part 1.  So, I took the left over paper from the Wildflower pad and cut it in half (I had cut 2" off, so this gave me 2 1" strips).  I again added red liner tape in back and then velcro in the front for a way to open and close.  I created one more flower using the embossing folder and stencils and again tried my Nuvo drops in a "glob" that dried with dimension.  I attached this to the front of the closer and I have a very pretty band for my cards.


Now, I still have my leftover red flower.  So, I found a stenciled background I had made in the Stenciling course.  It was made using Scrapbook.com's Cloud Whip and Altenew's Mango Smoothie Ink cube.  I cut this down to 4 x 5 1/4".  I then cut some leaves from the Altenew Leaf Essentials Die Set.  I added a little dark green onto my leaves to add a little more color.  I then put my flower in the bottom right on foam and the leaves underneath glued down.  I found a layered "For You" die in my stash and cut it from 2 colors of red card stock and the top layer from some red mirror cardstock.  After adhering this down, I added 3 red jewels for a little more shine!


And here are the final cards that I made for this.  I love how they came out and I love that there is a bonus, unexpected card to include as well......you always have to have that one-off thing.


Thanks for visiting and I hope you got a tip or two out of today's information.  Keep on crafting.

Donna T.


Products Used:


Altenew Sunshine Blossoms & Courageous You Bundle


Altenew Leaf Essentials Die Set


Altenew Vintage Roses Layer Stamp Set

Altenew Wildflower 6x6 Paper Pad

Altenew Mango Smoothie Ink Cube

Simon Hurley Solar Paste – Cross My Heart

Stampin’ Up Ink Pad – Mossy Meadow

Stampin’ Up Ink Pad – Granny Apple Green

Stampin’ Up Ink Pad – Berry Burst

Stampin’ Up Ink Pad – Blackberry Bliss

Stampin’ Up Ink Pad – Cherry Cobbler

Stampin’ Up Ink Pad – Sweet Sorbet

Stampin’ Up Ink Pad – Polished Pink

Stampin’ Up Ink Pad – Bubble Bath

Ranger Stickles – Diamond

Nuvo Crystal Drops – Dandelion Yellow Gloss

Nuvo Crystal Drops – Pink Orchid Metallic

Nuvo Crystal Drops – Copper Penny

Nuvo Crystal Drops – Shimmering Rose Metallic

Nuvo Crystal Drops – Orange Soda Glitter

WOW! Clear Ultra Slow Drying Embossing Pad

Brutus Monroe Embossing Powder – Alabaster

Pink and Main Flower Power Foilable Kit

Pink and Main Flowers Silver Cheerfoil

For You Layer Die (not labeled in my stash)

Scrapbook.com Cloud Whip

Velcro


Sunday, October 22, 2023

AECP Level 1 - Seasonal Scene Building

 For the last course on Level 1 for the AECP program, we went over scene building and many techniques that could be used in scene building.  Scenes can create such wonderful cards and I was excited to work on this card.  But the stamp I wanted to use was still in the mail!!!  It did arrive and I have finally completed my card.


For this card, I wanted to use foil and also do a shaker card.  So, I started with the foiling.  I took my toner panel and picked a sparkly silver foil.  I sent this through my machine and the outcome was just gorgeous.  I loved this look, but already knew, the stark white background would probably need to change.


Next, I began stamping my images.  I used the Altenew Cozy Winter Vibes Stamp Set and picked the "Warm Winter Wishes" sentiment and the family building a snowman.  I used my stamping tool and stamped these using my black dye ink which can be used with Alcohol markers.


I then started coloring.  I used my alcohol markers to color the image as I love the way that the colors can be blended and you can show shading in the image.  I did add some very light coloring to snow and the snowman as well.


I have not gotten the dies for this stamp set yet, so I used my scissors to fussy cut the images.  This was not bad at all.  I did not cut the sections between the people, but overall, I think it looks great.

Now, I needed to figure out what my top panel could be.  I thought about making a top panel and then remembered that I have been wanting to use some of the massive stacks of pattern paper that I have.  I found a great 6x6 piece that would match my colors and scene and cut it down to 5 1/2 x 4 1/4".  I found a die in my stash that would create an opening large enough for my image and yet give me plenty of room around the sides for the foam tape since this will be a shaker card.  I die cut this opening in the center of my patterned paper.  

I started laying all the pieces together and I confirmed that I wanted my foiled panel to have some color.  Therefore, I picked two shades of blue and ink blended on this panel.  After doing this blending, I lightly wiped the panel with a clean cloth to ensure no ink pooled on my foiling.


It is now assembly time!!  I had cut some acetate just slightly smaller than 5 1/2 x 4 1/4" and adhered this to the back of the top panel using a tape runner.  I laid this on my foil panel to get an idea of where I would put my stamped image.  Once I found the right spot, I glued that stamped image to the foiled/background panel.  I then added a thicker foam tape around the outside of the top panel.  The foam tape was  3 mm thick which is new to me and will hopefully solve my previous issues of my shaker elements getting stuck because there is not enough room.


I created a little dish of the shaker elements I wanted to use.  I chose some snowflake confetti and then some white round confetti.  They each have a sheen that makes them sparkle as well.  After I was satisfied with the amount and items, I poured them carefully in the center of my foil/background panel.  I do this, because I find it easier to place the top over this for alignment.


I added a little glue over my foam tape to hopefully give me a little wiggle time if I need it, then adhered the two panels.  Let me just confess, the first go at this was a mess.  I picked up the card to check the alignment before I had pressed down the edges enough and confetti went flying!  I had it everywhere.  But I cleaned it up and tried again, this time, ensuring I had pressed it down good before picking anything up.  Last, I adhered the sentiment in the top left with some glue.


I love the way this turned out.  The family is so pretty and the shaker elements just makes the scene so cute.  I hope you have enjoyed this card and will give your own shakers a try.


Happy Crafting!

Donna T


Products Used:

Altenew Cozy Winter Vibes Stamp Set


Momento Tuxedo Black Ink
Catherine Pooler Tranquil Ink
Catherine Pooler Stone Blue Ink
Taylored Expressions Beautiful Blizzards Foil It
Silver Foil
Gina K Fuse Foiling Machine
Acetate Sheet
BoBunny Altitude 6x6 Paper pad
Copic Alcohol Markers
Nuvo Pure Sheen Confetti - Opal Cream
Snowflake Confetti
Scrapbook.com 3mm foam tape


AECP Level 1 - All About Layering 4

The second course about layering continued to give great ideas on how layering can be used in either the colors, the backgrounds, the sentiments, and more.  


For my project today, I used one of the first items I purchased from Altenew which was the Altenew Layered Dahlia Stencils.  I loved how versatile this stencil set was, but yet, it was quick and easy to use.


So, I decided to do something that was very quick and easy.

I started by laying my stencil onto a 4 x 5 1/4" card panel to get an idea of where I wanted my flower to be and which parts of the stencil I would be using.  Once I picked the flower and put it in the left lower corner, I found that nothing would be cut off from a missing flower because those pieces would not be on the card panel.

I then started with the first stencil using a lighter blue for the flower and a lighter green for the leaves.  I made sure to use a low tack tape to mask off areas I was not covering.  I also made sure to wipe off my stencil between colors to make sure there was no mixing.

Then I went to the second stencil and repeated the process with the darker colors.  These two steps make a gorgeous flower with really very little effort.

I put this panel on an A2 card base.  I then cut the hello sentiment in black cardstock and attached it, overlapping my flower just a bit.  Last, I added a few jewels from my stash.


Such an easy card, but again, it makes a big impact.  Thanks for stopping by and keep on crafting.


Donna T.


Products Used:

Altenew Layered Dahlia Stencils

Hello die cut
Ink colors - light and darker blue, light and darker green


Saturday, October 21, 2023

AECP Level 1 - All About the Layering 3

For my first course for the Altenew Educator Certification Program, it was all about layering.  This makes total sense because stamp and stencil layering was what attracted me to the Altenew Products.  They have the best products to layer colors on your image.  Now, this was not all that was covered in this class, but it was good to start with the basics.


For today's card, I used the Altenew Build-A-Flower: Stargazer set.  I love this flower and it turns out beautifully when you add several layers of colors.

I started by making by background (4 x 5 1/4" card panel).  I used some teal mica spray in my splatter box.  I sprayed the panel a few times and then set aside to dry.

Then I stamped my main flowers.  I used my stamping platform so I could do each layer twice without having to realign.  I picked some coral/red colors and started with the lighter color and using the most covered image.  I followed the instructions on the package for the order of each layer. 

After the flowers were done, I stamped 3 of each leaf using some greens and one image of the little flower just stamped with the black outline.  I then used my alcohol markers to color in those flowers in a purple color.


My next step was to die cut all these images.  I laid them on the dried card panel and made sure to overlap pieces and I turned the big flowers so that they actually look like two different flower images.  I added 3 leaves with each big flower (the rule of 3, or using odd numbers around your image).  I secured these.  


Last, I added 3 jewels (again the rule of 3) and attached a sentiment that I already had in my sentiment stash.  I put everything on a white A2 card base.


I love how this card turned out.  It is so colorful and hopefully will brighten anyone's day that is dealing with a sad loss.


Thanks for stopping by and until next time, keep on crafting.

Donna T.


Products Used:


Altenew Build-A-Flower: Stargazer


Friday, October 20, 2023

AECP Level 1 - Let It Shine

The Let It Shine class was good to see how you can add shine, glitter, texture, etc. to your projects.  And who doesn't need more shine!!!


I began this process by embossing with the Altenew Perfect Gift Embossing Folder.  I then took out the stencil and used my Starry Sky Sparkle marker to make the frame.


Next I took my two glacier pastes and put them on some extra white cardstock.  I scraped it back and forth both directions to mix it together.  I set this aside to dry, as I will be cutting my sentiment out of it.  Glacier Paste is always so shiny!

Then I used the stencil to color my flower and my leaves.  I did use the Moonlight marker which has a lot of sparkle for the middle of the flower which adds a lot to this flower.  I did get some ink on my card panel in places I did not want it, so I decided to fussy cut the image out to mount on other card panels.


After my Glacier Paste dried, I cut "Perfect Gift" from Altenew's Perfect Gift Bundle from this.  The two words were attached, so I had to cut off Gift.  I then cut 3 more in white card stock and glued them under the Glacier Paste one to make a thicker, more stable sentiment.


I used the sentiment from the Altenew Dynamic Duo: Treat Yourself which said "Wishing you the best", but I did not want the "best" included.  So I masked my image on my stamping tool and stamped the rest of that sentiment at the top.  I used the "birthday" part of the sentiment from the Altenew Perfect Gift bundle and stamped it low on the card.  I glued down the "perfect" in the middle.


I picked a textured card base and cut it to 5 1/2 x 8 1/2" and scored at 4 1/4" and folded.  I then found some blue pearl paper and cut it to 5 1/4 x 4" and added that onto my base.  Then I put my flower panel on foam and mounted it onto the card base.


I really like using all the blue because I don't usually use blue on my flowers.  And the added shine and sparkle, just really makes this card awesome.

Until next time, Keep on crafting.

Donna T.


Products Used:

Altenew Dynamic Duo: Treat Yourself

Altenew Perfect Gift Bundle

Nuvo Iron Frost Glacier Paste

Nuvo Sea Sprite Glacier Paste

Paste knife and spreader

Spectrum Noir Moonlight Metallic Flip Marker

Spectrum Noir Starry Sky Sparkle Marker

Catherine Pooler Suede Shoes Ink

Catherine Pooler Stone Blue Ink

Catherine Pooler Dress Blues Ink

Catherine Pooler Martini Ink

Catherine Pooler Eucalyptus Ink


Alcohol Ink Flowers – AECP Level 3 Final Project

**** WARNING – This is a very long post about my journey with AECP **** When I started the Altenew Educator Certification Program, I thoug...